So where are we today? Well, just about everything can be done in the cloud nowadays. At least, there are SaaS services available that offer standard functionality to support most business processes. And then there are all the integration possibilities both between services (e.g. data-mining) and with business specific solutions (e.g. via Force.com or some form of REST API or similar). In short, it is possible for companies to choose their comfort zone when adopting cloud technologies.
We mustn’t forget that virtualisation is the backbone of all cloud infrastructures. Functionality like thin-provisioning provides economies of scale and a more efficient use of resources. Virtualisation started in the enterprise as private clouds and is still as relevant today even with the fantastic flora of public cloud offerings. So picking your comfort zone raises some important questions for companies, the most important being, what are the business drivers for adopting cloud technologies?
There is the obvious cost driver that can be realised with virtualisation coupled with hosting (aka IAAS). Virtualisation provides efficiency and hosting eliminates the need for resources for management and maintenance activities. This also brings us to the competence driver. IT organisations are implicitly expected to remain small and basically invisible to the rest of the organisation. Certainly in the Cloud Age if you need more IT people instead of outsourcing then the view is that you’re doing it wrong.
Virtualisation products also deliver a host of other functionality that can be important business drivers. High-availability, scalability and performance monitoring features are common to probably all IAAS platforms. So outsourcing infrastructure can provide cost savings plus lots of new features in a like-for-like migration, i.e. moving from on-premise to an equivalently performing cloud infrastructure with respect to the potentially different workloads of each IT system (e.g. IOPS vs. data-mining).
The next driver to look at is flexibility, the ability to be able to bring more resources online in response to a temporarily increased workload. The question is, does the organisation need flexibility, really? Yes, loads vary, but this must be weighed against the cost of hosting in an on-demand infrastructure instead of, say, a (virtual) private cloud (VPC). A VPC can of course be extended to meet increased workloads but this is a more long-term activity such as meeting the needs of a growing organisation. But, if just a single application requires extra capacity then this does not motivate putting the entire IT-environment in an on-demand IAAS solution such as AWS or Microsoft Azure. Certainly this is true of larger organisations which have a bigger and more stable infrastructure footprint.
Flexibility then is achieved using a hybrid solution. The backbone of the IT infrastructure should be virtualised as much as possible using a private cloud (on-premise or hosted). The private cloud will have a predictable workload and will expand or change at a strategic pace. The private cloud is then complemented with on-demand resources from an on-demand infrastructure supplier such as AWS for handling peak workloads. Finding a balance between these two costs can be achieved using the resource monitoring tools in both platforms. Vertical vs. horizontal scalability is also a deciding factor.
Security concerns are usually not a business driver. By this I mean confidentially and integrity of data when some or all of the IT systems are residing in one or more IAAS platforms. These platforms usually provide networking capabilities such as VPN to allow the corporate network to extend into one or more cloud infrastructures and so provide seamless integration between the various IT systems. Central authentication systems can also use the same VPN tunnels to control authentication and authorisation in all the relevant systems.
To summarise, this walkthrough of the IAAS landscape shows that you can pick your comfort zone with a proper analysis of the infrastructure requirements. The benefits are huge so some of the cost-savings should be used to over-dimension the infrastructure solution and so save time performing difficult workload analysis. Hopefully the company will grow into its new suit and this will also provide important input to future infrastructure investments.
Author: Kevin McNamee
Dimensioning database storage
When building a database system with servers and disk arrays, it is not immediately obvious how to best utilize the available drive bays to create an optimised database storage setup. Let’s look at some requirements.
Requirements
The biggest considerations when selecting a storage solution are:
- High-availability (HA): the system must fail gracefully not catastrophically. This means that some form of RAID must be used and hot spares should be available.
- Disaster recovery (DR): in the case of data loss or corruption we need to be able to restore the database from a backup. This must take RTO and RPO into account. Can the backups be compressed?
- Capacity: How much data is expected to be stored in the system? Usually the data volume grows continuously, so the capacity is often calculated with respect to the lifetime of the hardware.
- Transaction intensity (IOPS): How much throughput should the disks handle? Remember stripping across small disks is preferred. The advent of SSD is starting the change all that with Oracle now able to handle tiered storage types.
Storage options
While the database may need high-performance SAS/FC disks or SSD, the backup disks only have to perform sequential reads (database restore) and writes (database backup), and so can make do with slower TB SATA disks.
So looking to your vendor, there will be a range of different solutions available. Some servers (rack-mounted) will have in-built storage capacity ranging from 2 up to 25 bays. Other servers will have just two internal disks for the OS and database application, and will instead be connected via FC to a dedicated disk array solution to provide storage. Disk arrays include all the features needed for creating an HA storage solution.
Next are the disks. FC disks are the most expensive, but with the advent of competitive SAS disks are not worth the money unless you need every once of performance you can get. Disks come in various sizes and for the database the relatively small 300GB or 600GB SAS disks are a good choice. For the backup there are 1TB or 2TB SATA disks available.
Capacity
Once the choice of disks is made, then it is possible to calculate the number of disks needed. This has to take three things into account: 1) RAIDing will consume 20-50% of the raw disk capacity, 2) the remaining disks shouldn’t be filled to more than 50%, though in practice 70% is usually an acceptable planning capacity and 3) that a minimum of two hot spares are needed. The logic is that during the time it takes to replace a spare disk, the disk array will still be providing HA with the remaining hot spare.
Calculating capacity can be tricky. When selecting a 300GB from the vendor, this is the SI definition of a Gigabit which is 1000000000bits. However, from the OS point of view the disk is 279GiB which is a somewhat smaller value but is using the traditional binary-based Gigibit definition. So when asking the sales team what capacity they need for the customer just be clear which dimensions they are using to avoid embarrassment later.
OK, so finally to the DR requirement, how much backup storage is needed? Well let’s assume we want to use uncompressed backups, this is less processor intensive and will result in faster restore times. In this case, the backup size is the size of the database. On day one we make the first full backup. On day two we make a new full backup, but we can’t delete the first backup until the new backup is completed so there must be sufficient space for two full uncompressed backups. In my experience, the last two full backups were saved due to the critical nature of the data, so this required a backup storage capacity that was three times the size of the planned database capacity.
Solution portfolio
Now, we have examined all of the requirements for creating a high-performance, highly-resilient database solution that matches the customers capacity and performance requirements. But this case-by-case dimensioning process is a time-consuming analysis that doesn’t scale well. Instead, we want to create and maintain a portfolio of standard database solutions that the sales teams can just pick from. This means that all the calculations are performed once in advance. This strategy also aligns itself with creating filled disk array configurations since disk arrays are expensive compared to the disks themselves (especially SAS and SATA disks). The choice we have in deciding which hardware components to use becomes instead a choice the customer can make to get the best value for money.
Example: HP DL380P
Let’s apply all of these rules to a HP DL380P solution that has a 25 disk SFF (2.5″) backplane. The SFF backplane is needed because the database needs many small fast disks, which means that all disks in the server will have to be SFF including the ones used for backup. The two disk sizes available in SFF are 300GB and 600GB.
The 25 disk bays are divided into three groups, one for the OS and database application, one for the database storage and one for backup. The OS and application don’t need much space so one mirrored pair of 300GB disks will suffice.
For the database storage 300GB disks will be used and for the backup the 600GB disks. So, how do we divide the remaining 23 disk bays between storage and backup? This is a process of trial and error. First, we allocate two bays for hot spares for the database. Then we pick a RAID strategy; RAID 1+0 (mirroring then stripping) provides the best performance but with the result that half the disks are used for redundancy. Hot spares for the backup storage would be overkill and RAID 5 provides sufficient performance with a capacity loss of just one disk for parity.
The final configuration looks like this:
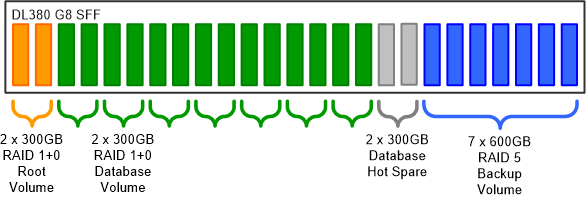
And here is the math:
| Database storage | |
|---|---|
| Raw disk capacity | 4500GB (16 x 300GB) |
| Hot spares | 2 |
| Redundancy strategy | RAID 1+0 |
| Usable capacity | 1470GB (7 x 300GB x 70%) |
| Reported capacity | 1953GiB (7 x 279GiB) |
| Backup storage | |
|---|---|
| Raw disk capacity | 4200GB (7 x 600GB) |
| Hot spares | 0 |
| Redundancy strategy | RAID 5 |
| Usable capacity | 3600GB (6 x 600GB x 100%) |
| Reported capacity | 3354GiB (6 x 559GiB) |
| Ratios | |
|---|---|
| Database usable/raw | 32% (1470GB/4500GB) |
| Database usable/total | 17% (1470GB/(4500GB + 4200GB)) |
| Backup usable/raw | 85.7% (3600GB/4200GB) |
| Backup/database | 2.45 (3600GB/1470GB) |
From this example we can create a high-performance database configuration with a usable database capacity of 1.47TB. The ratio of backup to database storage is 2.45 which means that there is space for one backup plus the creation of a new backup. To allow for two full backups to be saved, two more disk bays could be allocated to the backup storage, lowering the database capacity to 1.26TB. Alternatively, the marketed capacity could just be lowered to 1.2TB (3600GB/3) which may be more flexible.
The actual usable storage space as a percentage of the total is also interesting. Just 17% or 1.5TB of the total 8.7TB can be used to store application data.
Finally, two of these database configurations (a primary and secondary) are needed to provide redundancy at the database application level. This is for two reasons: 1) in case of database application failure (a failover) or 2) for maintenance operations on the primary (a switchover).
The easy way to digitalise old photos
…is to let someone else do it. But I thought I would have a go myself first.
Having gotten control over our digital photo collection I thought it would be great to be able to include even old photos (35mm film) in slide shows and what not. For some reason I thought this would be a piece of cake. After all, digital photography has been around for about 20 years so any computer aficionado should be able to convert their photo collection with a suitably priced scanner.
This turns out to be far from the truth. There is a huge variation in the type, quality and price of scanners available. Furthermore, it is a limited market with a limited product range given the fact that nobody uses film cameras any more.
Since choosing a suitable scanner can be difficult, a professional scanner service started to seem like a worthwhile option to pursue. Such a service is fast and produces good quality digital images, but with 2,000 frames to digitalise it would cost in the region of €700 to do so. One option could be to sort through negatives to find the best photos but this is time-consuming and a premium might be charged for the handling of individual negatives. In short, I needed to decide what the goal of my digitalisation project was.
Setting a goal
So my choices were: a) a professional service, which is the most efficient but costly solution to choose but would probably produce the best digital images or b) buy a good digital scanner and convert all of the photos on my own time or c) buy a cheap scanner for making quick low-quality images for one-off use such as e-mailing. Whether I used a professional service or not I would still have to do any post-processing myself such as rotating the images. Either way, the better quality I wanted the more expensive it was going to be.
So my goal was still to convert our entire 35mm film collection into digital images of a quality similar to our 4 Mpx camera. A further consideration was whether or not to aim for the highest possible quality so that I no longer need to rely on having access to the negatives, but that would cost way too much and the negatives should survive until a cheaper technology appears. However, I still could not make a decision without some idea of what I would get for my money. Time to do some research.
Research
One site I found that does a great introduction to film scanning is Filmscanner which compares professional services vs. DIY. It also looks at purchasing criteria when buying a scanner: quality, speed, noise, space, etc., as well as reviews of some of the best scanners available.
WikiAnswers provides some useful insights into film scanning with the question:
How many megapixels would it take to equal a 35mm film maximum quality?
So what does a professional service cost?. There have been many film format types in use but I am only interested in comparing prices for a basic conversion service for 35mm film. (For more information on other types of media have a look at the list of conversion services available at ScanDig.) It turns out that the pricing is very similar across the board although the final result may vary.
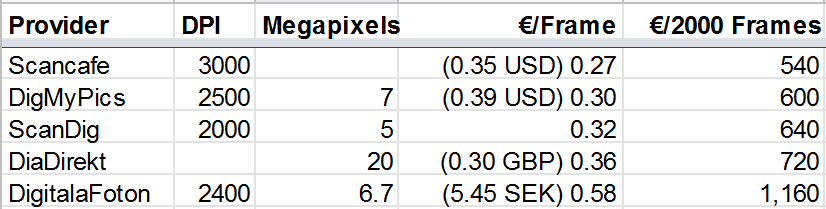
Professional services also offer even higher resolutions and sometimes even various post-processing services such as dust correction and Photoshop retouching for a price.
The other option is to buy a scanner, however the price can vary enormously – from under €100 up to €15,000 for professionals. The main factors in making a decision are price, quality and speed, and the three most important factors that influence the image quality of a scanner are resolution, colour depth and range of density. (See the FilmScanner primer for information on what these values mean.) For cheaper scanners these values may well not be provided by the manufacturer at all which is a bad sign. Disk space is not a problem these days and is a negligible cost consideration.
Here in Sweden you can use Prisjakt to find film scanners and compare these three parameters for different scanners which is an excellent way to shop around. Other product comparison sites probably have a similar function. So if I am going to spend my time scanning all of these negatives then it is worth investing in some decent equipment and so the choice so far is between:
- Plustek OpticFilm 7600i with SilverFast SE Plus 6.6
€269 at ScanDig - Reflecta ProScan 7200 + SilverFast Ai 6.6
€529 at ScanDig - Reflecta RPS 7200 Professional + SilverFast Ai 6.6 IT-8
€579 at ScanDig (Has automatic feed!)
But for every €100 spent on a scanner I could get approx. 300 frames scanned by a professional scanner service. On the other hand, once I am finished digitizing our 35mm film I could give it to my parents and others interested in doing the same thing.
What to do
Perhaps the best way to get started is just to select a small batch of film, say 24 photos, and get them converted by a professional service just to see what the resulting images will look like. It shouldn’t cost more that €10 to €20 (including postage insurance) and then I will have something concrete to test with such as creating slide shows or getting reprints made. For a bit more money, I could also have the conversion done in two different resolutions for comparison. This should help me decide what to invest my money (and time) in whether or not to pay someone else.
If all goes well, I’ll be sure to send a copy of our new digital photo collection it to the parents for safe-keeping. Wish me luck.
A case of computer archaeology
My father-in-law had researched his family tree some 15 years ago using a software program to help manage the data. The program was called Reunion 4.0 and ran on an Apple Macintosh PowerBook 165c. Once the project was finished, the program was no longer used and the computer was eventually mothballed.
I first heard about this project a couple of years ago and that my father-in-law was interested in adding new information to the family tree. I realised immediately that there was no time to waste in retrieving the data from the old computer. The data had never been backed up and no one knew if the computer still worked nor if the data could still be transferred from it!
Extract
Fortunately, none of this turned out to be a problem. The sturdy little PowerBook ground into life and the Reunion program started. I took an old floppy disk and formatted it in the floppy disk drive. Then there was a choice of saving a copy of the genealogical data in native format or exporting it to the GEDCOM format. I did both since I had no idea if I could read the native file (most likely binary) format or if the text-based GEDCOM file contained all of the same information.
Getting it onto the PC took a while. I had no floppy disk drive. Off to the neighbours who had one and who then emailed back the files back to me. There were over one thousand people named in the family tree! Step one complete. Or so I thought. It would take another two attempts before I got the version of the data file with the most number of individuals in it transferred to the new computer.
Transform
Next, find a program to open the native Reunion file with. Leister who make Reunion no longer distributed the program for PC. However, they did offer a conversion service free-of-charge for which I am very grateful. I sent off the native files and a few hours later got a GEDCOM 5.5 file back with all of the information in it. Having the data in the GEDCOM format meant that I could in principle import the data into any other genealogy program. The first PC program I looked at was GenealogyJ which has lots of features but did not import all of the information in the GEDCOM file. In fact it silently ignored a lot of fields which made it totally unreliable for my purposes.
The file from Leister naturally enough used MAC OS character encoding, so before importing it into a PC program I need to convert it to DOS. UltraEdit makes this easy. The standard character encoding for GEDCOM files is ANSEL although most programs will handle DOS and/or UTF-8.
Load
Next I found MinSläkt which did a very thorough job of importing the data and warned of all problems that occured during the import. There were lots of problems. Time to look at the GEDCOM standard. It seems that the GEDCOM file from Leister contained many deviations from the standard all of which I had to correct by hand. To this end UltraEdit and UltraCompare were invaluable tools for identifying and solving these issues. These were:
- Removed all _UID fields
- Fixed GEDCOM header: missing, superfluous or incomplete information
- Fixed incorrect date formats
- Moved addresses from FAM to INDI.
- Replaced @C90@ with NOTE
- Replaced all NSFX with TITL
- Moved RELI to NOTE
- Converted all ADDR in INDI to RESI
- Fixed HEADER error
- Converted SOUR to NOTES. This was a compromise since MinSläkt does not support citations that are not connected to events. On the other hand no sources had been named so no information was lost.
After that, the import ran without any errors or warnings and no information loss had occurred as far as I could tell. At each stage of the conversion I saved a copy of the file so that I could go back one steps or more if needed.
Now I had a program that I could use to manipulate the ancestry data with. But before continuing I tried testing the GEDCOM file for any errors that MinSläkt might have missed. A free GEDCOM validator found only one minor error in the updated GEDCOM file and the warnings could be safely ignored. For comparison I ran just the default checks on the GEDCOM file from Leister: 101 errors found!
Test
Now I could start working with the tool. I tested different views, editing fields and adding individuals and families according to the new information that was available. I had never used genealogy software before but I quickly understood that maintaining references to the sources for information entered into the program was essential for resolving conflicts when they arise between different sources. Unfortunately MinSläkt only supports one citation per source per event, even though the GEDCOM standard allows multiple citations from multiple sources to be associated with any piece of information – not just events. A reply to an inquiry to the developers of the software did not bode well for any improvement to this functionality.
Surfing the net again I eventually found Family Tree Builder (FTB) which turned out to be a much more advanced program (and free!) and with a much more elegant interface. The program has online research functions and advanced photo handling capabilities as well as being easy to use. Before the import could succeed, a few minor corrections were needed, in line with the GEDCOM standard:
- Changed PLAC to ADDR+ADDR1
- Converted “NOTE Religion:” back to RELI
Finally, it felt like I was on the right track. The tool even had Swedish language support which was appreciated. After some more testing I was satisfied that this tool was reliable and user-friendly.
Final touches
Time to inspect the family tree. The following housekeeping tasks were identified:
- Fix typos
- Fix duplicates
- Run the control function to check for inconsistencies in the archive. Also identify unconnected individuals.
- Tidy up individuals
- Check for deceased individuals
- Add descendants
These tasks I left for another day. After that I backed up all of the migration files to USB memory as well as the current copy of the data from FTB. Now the family tree could once again be extended.
At the touch of a button
Not happy with the off-the-shelf media centre solutions on offer I built a HTPC based on Windows Media Center (WMC) that was small enough and quiet enough to blend into my living room. In other words, I couldn’t hear it or see it. This allowed me to replace our ageing stereo, DVD player and video player and three remote controls. That was about two years ago and I am still pleased with the result.
But as with all things technological, they become obsolete or need upgrading in order to keep them working. There were intermittent problems with playing DVDs and CDs that didn’t go away when I replaced the DVD player in the HTPC. Another issue was that the cable TV provider switched from analogue to digital TV which meant not only that I could no longer record TV using the analogue TV card in the HTPC, but now I had a another (decoder) box and another remote control to contend with.
The first upgrade was to replace our faithful 28″ Philips CRT TV with a new 32″ Samsung LED model that is very pleasing to the eye and fits a lot better in our living room where real estate is at a premium in our apartment. Bigger picture, sharper image but also built-in support for a CA module (eliminating the need for the separate decoder) as well as a HDMI socket for optimal AV connectivity with the HTPC.
So far so good. The next step was to upgrade the HTPC with Windows 7 Home Edition (OEM 1,145 SEK) which included a new version of WMC. This seems to have solved the DVD/CD playback problems. It also allows file sharing with the HP laptop that is also running Windows 7 using the new Homegroup feature.
Of course the real purpose of having a HTPC is to be able to access all of one’s media at the touch of a button: photos, music, videos, films, etc. At this point I had sufficient hardware to make a decent go of it: Digital TV, laptop and HTPC. One of the benefits of the HTPC is being able to add new features as the become available, so expectations were high.
Viewing one’s prized digital photos on a large screen is a pleasure. We manage our photos on the laptop using Picasa and also use Picasa Web to post them to the Internet. With file sharing the pictures could also be viewed using WMC. However, this required that the laptop is powered on and that the HTPC has connectivity to the distant wireless network, neither of which is always true. So rather than using file sharing, the solution was to synchronise the photos to the HTPC once a day. This eliminates any connectivity problems when viewing the photos and as a bonus, functions as a backup location. Without too much research I paid $30 for Beyond Sync which has a scheduler and real-time sync options.
There is also a whole library of MP3 music files on the laptop that should be able to be played back on the HTPC. This was solved the same way as for the photos using synchronisation. However, buying CDs and ripping them to disk is no longer the only way to stream your music. Now there are services like Spotify which can stream music for free to your HTPC. Enter Songler which is a free plug-in for WMC that allows one to control Spotify from your Windows remote control. Songler also has support for LastFM and YouTube.
And lastly, videos and films. I have a few video files on the laptop that can also be synced to the HTPC, but all of my films and TV series are on DVD. Two reasons for wanting to transfer DVDs to the HTPC: DVDs for the kids are prone to damage due to excessive handling and TV series one watches one episode at a time which results in a lot of DVD changes. WMC does not come with any DVD ripping function but there is an excellent program with plugin called MyMovies which costs $50 for disk copy functionality or $100 for full functionality. DVDs are usually copy protected so AnyDVD is a must for $64 (lifetime license).
As with music you can now stream video to your HTPC. YouTube is one such service and there is the MacroTube plug-in. Here in Sweden, the TV stations also provide a streaming service called “Play” for recently shown programs. This is also accessible from WMC via the Play-kanaler plug-in.
The only feature missing is recording TV programs, but I watch so little live TV nowadays that TV Play suffices. And following a TV series at the same time every week is just not possible. There are digital TV PCI cards available but then one also needs to buy a CA-module and a second subscription which isn’t worth it for me.
So now all of my photos, music, videos and films as well as music and video streamed from the Internet are available at the touch of one, or well, just a few buttons. Now only time will tell if all of this time and effort and money will result in a unified media experience.
Resuscitating old hardware with a Xubuntu transplant
Was at the in-laws over the Easter weekend and as usual I can’t sit still for very long. I usually do a round of maintenance on their computer but this time there was the old laptop which was still set up and used from time to time. This Amilo M series laptop was about 8 years old and hadn’t been reinstalled since it was delivered with Windows XP on it. It took me 20 minutes to boot it up before I could actually start an application. Time for an overhaul – the in-laws said fire away. This is what I had to work with:
- 1GHz Celeron processor
- 256MB memory
- ProSavageDDR K4M266 graphics card
- 8, 16 or 32MB configurable shared graphics memory
- 20GB hard-disk
- CD-ROM
A D-Link DI-524 Wireless USB dongle provided network connectivity. Also, the monitor was broken and had been removed. Instead, an LG 1510S 15″ monitor was attached via the VGA port which was just fine.
A flavour of Linux was the obvious choice of OS for this type of old machine and I chose Ubuntu. Downloaded and burned an image and stuck it into the CD-ROM. Configured the BIOS to boot first from the CD-ROM and presto up comes the Ubuntu start menu. There is an option to try Ubuntu without installing which I did.
This is where I encounter the first and most serious problem with the installation: a hard lock when starting X-Windows. This threw me. I knew the machine was old but a hard lock and a black screen wasn’t much use when trying to analyse the problem.
I switched to the more lightweight Xubuntu to no avail. I even looked in the BIOS and discovered the shared memory setting and bumped up the value from 16MB to 32MB to see if it helped, which it didn’t. Eventually, a Google search led me to identify the problem as a bug in the video card: “S3 ProSavageDDR K4M266 hard locks on X init when DRI is enabled”.
I stuck with Xubuntu and got it installed and presto!, logged in for the first time. I hadn’t managed to get connected to the network via the USB dongle during the installation, but once in in the windows system it was just point and click and connection complete.
The second problem occurred after I allowed the Xubuntu Update Manager to install the latest updates. After a reboot, the machine started doing a lot of page-swapping and the entire windowing system moved like tar. Well, the machine was newly installed and didn’t have any load so the prime suspect was the windowing system itself. This time I reduced the shared memory to 8MB (the lowest setting). Bingo! the paging problem disappeared.
With the basic installation complete, the most common use of the computer will be for guests to
- surf (Firefox)
- make phone calls (Skype)
- chat (Pidgin, Skype)
- watch videos (Flash player)
- play single-player online games (Flash player)
- play music (Spotify)
- write documents (OpenOffice)
- printing (Windows Samba printer)
All this was a breeze to set up with the Xubuntu Software Sources and the Synaptic Package Manager tools. Spotify was only available as a Windows application but the Wine tool takes care of that completely transparently.
Each user can have their own account but since it is mainly for guests, I only created accounts for the system admins and a common “guest” account for everyone else.
And now it only takes one minute to boot this 8 year old computer that can do pretty much what most casual users want it to do.
Some gory details
When encountering problems with X like a black screen or hard lock, boot Xubuntu into a root shell. By default there is no /etc/X11/xorg.conf file when the system is first installed, but X can generate one that contains the settings it is actually using:
# X -configureThis is a big help. If the command runs successfully, then you also know that X is installed correctly.
The generated configuration file can be edited to adjust your settings.
# vi /root/xorg.conf.rootThe changed settings can be passed to X during startup to test them:
# X -config /root/xorg.conf.rootIf a black screen occurs then you can switch back to the shell by pressing Ctrl+Alt+Backspace. When you are satisfied with the new configuration move the file to its proper location:
# mv /root/xorg.conf.root /etc/X11/xorg.confMore by chance
I have worked for more than 10 years with system integration and the development of business processes and I feel right at home no matter what the environment is. I get a buzz out of making the lives of colleagues easier when I save them a day’s work with a script or tool that they can use over and over again for instance. Now as an IT manager we can tackle bigger problems using full blown web services and more.
But what sort of problems does one encounter?
Business processes pervade the entire organisation so improvements can be made in all departments from consolidating system dimensioning and system costing to automating software releases and more. But even a product the company is trying to develop and sell requires proper lifecycle management such as packaging tools, streamlined installation, etc., etc. It all points to efficiency: well-defined business processes supported by tools that can automate as much as possible.
How does one identify a problem?
Sometimes the problem is obvious because one hears the complaints at the coffee break but more often people can’t see any problems or understand that it is possible to do things more productively and efficiently. An employee is often given one particular task to do: they receive some information, perform their assignment and pass on the result. Of course, an employee can become more efficient at their assignment but they are often unable to influence the quality and timeliness of the information they receive. This observation applies equally to non-technical (managers, sales, marketing, customer services) and technical (developers, testers) staff.
Is the solution for everyone?
I have worked in companies big (10,000+) and small (<10) and they have all benefited from improvements to their business processes. The solution will always fit the problem, small companies have simple business processes (agile or otherwise) that do not require much investment to improve or automate. Small companies also benefit greatly from having a system integrator role by allowing developers to focus on those first product releases.
After all this time it surprises me that I have met so few others in the software industry that work in this area or with these issues. One reason is perhaps that it is not one role nor is it limited to specific tools or programming languages. Rather than being a specialist, one is working as more of a generalist and this does not fit well with job vacancies which are usually looking for specific competencies. It is more by chance than design that I ended up on this career path, but once on it I never looked back. So I am going to explore those topics that interest me and as a goal see if I can’t make a good business case for some would-be employer.