A central tool in managing the team’s work is the Kanban board. The team owns their Kanban board and everything on it. It is there to visualise the team’s work, to provide a sense of control and create a sense of flow. So for example, if there is a bottleneck in testing, it’s there for the whole team to see and the team can collectively prioritise eliminating it.
In short, the Kanban board is a powerful tool for creating a sense of collective ownership in the team. But there are some ground rules that apply otherwise this effect is lost:
The tickets on the board represent the team’s work and what can be delivered by the team. The board must not contain work done by external parties (i.e. anyone not in the team).
The team must ruthlessly prioritise, rework or eliminate stuck tickets. Even one exception can lead to more exceptions, and before long flow is lost.
Bottlenecks mean “all hands on deck” to solve the problem and regain flow. Plus, it makes no sense to keep pushing more work into an already long queue. WIP limits can be applied to highlight bottlenecks, but usually common sense prevails.
Following these ground rules means that any member of the team, at a glance, can see the status of the team’s flow, and know that if there is a problem with the flow then it is a) within the power of the team to solve that problem, and b) that is more important than pulling the next ticket from Todo.
If the team do not follow these three ground rules, then it will be hard to create a sense of ownership when there are a whole bunch of exceptions to the rules that erode the team’s sense of control. It becomes someone else’s problem.
Put another way, if the team use Kanban properly then it will create a sense of flow that everyone in the team can identify with and which transcends the individual roles and specialist competencies that a cross-functional team naturally has. But fail to do this, and Kanban is just another messy backlog with unclear priorities that the team eventually stops paying attention to. Then it just becomes easier to pull the next ticket from Todo instead.
I recently read an article about how to help someone get back to work after a long absence, perhaps due to illness or burnout. There was lots of good advice, such as keeping colleagues informed about adjustments to working hours and limiting responsibilities among others things. But what struck me was how a lot of the advice reminded me of the Agile way of working:
create clearly defined tasks
allow space to work on one thing at a time
provide support with prioritising
do not set short deadlines
set a clear plan for the week and a review at the end of the week
ensure delegation of tasks is done via a single channel
This could be from the Kanban playbook. To put it in Agile terms:
Tasks should have a clear definition of done
Developers should pull tasks, not have them pre-assigned
The Product Owner prioritises all work
Focus on outcomes not deadlines
Set clear goals and use daily stand-ups to ensure progress
Nobody outside the team can assign work to the developers
So you could say that creating flow does not just improve the team’s efficiency, it also contributes to the continued well-being of your employees.
In this article I will discuss how to get started with Agile in the most hands-on way possible, with no discussion of frameworks and methodologies. I believe it is important to understand the essence of Agile first, as it is easy to be overwhelmed with all of the techniques and tools that have evolved from it (Scrum, XP, SAFe, etc.).
The goal then is to create an iterative software development process that can be improved upon continuously. The only tool you are going to need is a stack of post-its and some wall space or a whiteboard where the team can work together.
Start small, which means starting at the team level. Learning to work in an Agile way will also require some experimentation as every team works differently. The point being that you will need to create some slack in the team’s schedule if you want to change the way they work. Finally, you or the team lead will take on the roll of Agile Team Coach.
I should also mention that there’s lots of help out there: blogs, forums and books. One excellent resource is the Agile and Lean Software Development Group on LinkedIn. Now let’s get started!
Step 1: Visualisation
First the team should start by visualising the their work, this is especially true in software development which by nature is very abstract. By visualisation, I am not referring to traditional documentation which tries to capture an entire scope such as requirements or test cases. What you want to visualise here is what the team is doing right now. For this you use post-its. Every team member writes down what they are working on, big or small, together with their initials in the corner, and sticks it onto a whiteboard or wall.
Now the team have an opportunity to discuss the work, make adjustments, add or remove post-its. The team can try to group related activities for instance. Spend about 5-10 minutes at this, no more; just enough time to smooth out the rough edges.
Step 2: Create flow
The next thing the team need to consider is what the definition of “Done” is for each post-it note. By “Done” we mean that the team is finished with the work item; it could be putting software in production, writing a manual, upgrading a database, etc. In reality, a lot of teams starting out with Agile do not have a clear definition of Done for their work items, so don’t sweat it too much yet. Fixing this will be part of the improvement process mentioned later on.
Create three columns on the whiteboard or wall and label them: Backlog, Doing, Done. Now each team member places each of their Post-its into one of the three columns. Finished? Great! You have now created your first Kanban board. (Here we introduce the most elementary and useful of Agile tools, the Kanban Board.)
So now the team has visualised their work and created a flow of work from left to right on the board. Congratulations!
Step 3: Reflection
The whole exercise above shouldn’t take more than an hour for a team of 10 people. Stand back and take a look at it. It may be obvious that some items on the board have unclear scope and some items are very large (or small). We’ll come back to these issues later.
One final exercise, sum the number of post-its in the Backlog and Doing columns and divide them by the number of members on the team. This will give you some indication of how much multitasking is going on and how much overhead is being created due to context-switching.
Step 4: Focusing on the goal
OK, the team have taken the important first steps in becoming Agile. And they will continue taking small steps, applying well-proven techniques that will improve the flow of work. But let’s discuss the goal; where is the team trying to get to? In the book The Phoenix Project, Bill is inspired by Lean manufacturing techniques used on production lines. Bill’s goal becomes the creation of a factory production line for his IT Department. As stated in Agile Principle #8:
Agile processes promote sustainable development. The sponsors, developers, and users should be able to maintain a constant pace indefinitely.
In other words the team shall create a process that they can reuse to build whatever software solutions the organisation or customers need now and in the future. The team can now take their new Kanban board and visualised work flow and use it to build a software factory!
Step 5: Breaking down the work
In our first iteration the team’s work items had unclear scope and different sizes. The team should deal with the scope problems first. This can be solved by breaking these work items into smaller items, each with a clear definition of “Done”. Spend 1-2 hours on this step, starting with the most important work items.
A classic problem is that a work item involves input from people outside the team. The Kanban board should not contain items that are assigned to “outsiders”. If this external work is a prerequisite for completing a team work item, then it should be added as a dependency to a team work item only. It is essential that the team have control over the work items on their board, even if they are currently blocked by external dependencies. The Kanban board should be used to focus on the team’s work!
Sizing of work items is about creating items that are of roughly equal size. As a rule-of-thumb, a work item should take about 2-3 days to complete, up to a maximum of two weeks. There are techniques for standardising work sizes, but for now I recommend a simple consensus from the team on whether an item is large or small or somewhere in between. Remember, if the definition of “Done” is software in production, then this must include coding, testing, etc.
In the worse case, a work item is so badly scoped and sized that it may not be possible to continue working on it in its current state and some more analysis (of requirements or architecture) is needed. If work stops altogether on such items then it should be moved into the backlog. This is one of the hardest things to do in Agile, but really knowing when a work item is ready for execution is one of the great benefits Agile brings.
A clear definition of Done for each item together with creating items of roughly equal size will build team confidence. By breaking down work items into smaller chunks and visualising them on the Kanban board it becomes possible for every team member (and stakeholders!) to understand what the team is going to deliver. And getting items to Done will make everyone happy.
Step 6: Limiting Work in process (WIP)
At this point the team have broken down the work into similar size chunks and this probably means that there are many more post-its on the board. (There are many tools available for creating digital Kanban boards, but this is still a low priority for now; wait 2-4 weeks before taking that step.) What the team needs to focus on next is WIP. This exercise should take about 30-60 minutes.
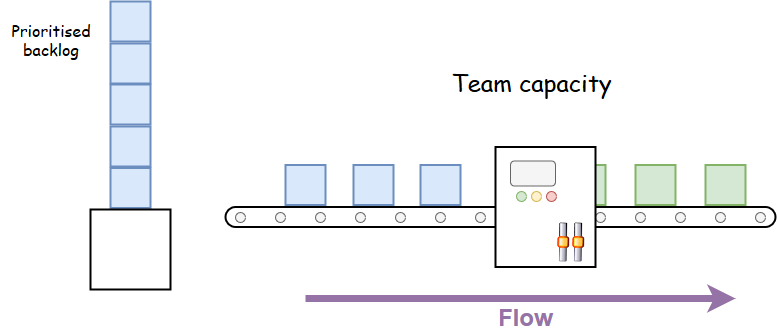
Earlier the team calculated how many work items were being done per team member. Ideally, each team member should be working on one item at a time, i.e. sequentially; so for a team of 10, the number of work items in the “Doing” column would be 10. In practice the figure is higher and the team need to think about what that number is.
In Agile terms, we are talking about the team capacity. We use this figure to set a work in progress (or process) limit (WIP limit). In other words, the team cannot start a new work item until they have finished a work item that is already in progress (unless an item is blocked). Remember, the team have a clear definition of Done for every work item, so they are supposed to be able to complete them before starting something new.
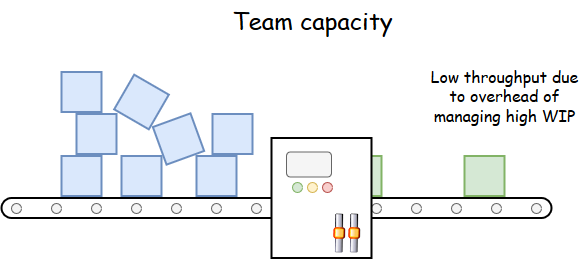
WIP limits are extremely important in creating flow. It follows that if the team tries to complete 20 work items at the same time it will take twice as long as if they were working on just 10 items.
For now, there is just one column with work in progress (“Doing”). The team should try to estimate how many man-days of work is in that column. Anything more than 30-40 days (3-4 days x 10 people) worth of work should be moved to the Backlog, and this means prioritising what needs to get done first. Prioritising is the responsibility of the Product Owner or Business Manager responsible for the product being developed, so naturally they need to be involved. Agile creates visibility for both the team and stakeholders!
Step 7: Daily stand-ups
Book 10-15 minutes with the team every morning for a stand-up in front of the Kanban board to discuss the day’s activities. The stand-up is for the team only, but guests can be invited on occasion. Longer discussions should be saved for break-out sessions with those involved. The focus of the stand-up is to make sure everybody knows what they are doing, if there are any blockers that need to be escalated, and to check that the Kanban board is up-to-date.
In case it’s not obvious, the Kanban board has now become the most important tool the team have for organising and visualising their work. Well done!
Conclusion
The team have made great progress! They have managed to visualise their work, create flow, size their work items and limit their work in progress. This demonstrates the concept of Continuous Improvement (“Kaizan“) as preached in Lean manufacturing, meaning that the team are constantly looking for ways to improve the flow of work.
In Agile we use Retrospectives to specifically discuss how well the flow of work is, well, working. All the team are involved in suggesting improvements, and then some or all of the team are responsible for implementing at least one improvement right away. Process automation (e.g. test automation) is a classic example of improving flow.
There are many, many other techniques that are used as part of Agile such as User Stories, Storyboarding, Minimum Viable Products (MVPs), backlog refinement and measuring velocity to create an iterative software development process. Scrumis a subject onto itself. But these are topics for another article.
Further reading
I highly recommend the following books:
The Phoenix Project by Gene Kim
User Story Mapping by Jeff Patton
Lean from the trenches by Henrik Kniberg
Accelerate by Nicole Forsgren, Jez Humble and Gene Kim